Zoho Kiosk Studio is a New Feature in Zoho CRM. It allows users to personalize their CRM interface. Users can create and Customize dashboards, forms, and views without coding knowledge. Kiosk Studio enables users to create custom dashboards with relevant information, design forms that capture specific data, create custom views, integrate with other Zoho apps, and provide granular control over user permissions and security. Kiosk Studio empowers users to unlock the full potential of Zoho CRM by tailoring the platform to their unique business needs and workflows.
Businesses can successfully manage their visitor experience with a comprehensive solution provided by Zoho Kiosk Studio in Zoho CRM. The platform helps organizations streamline operations, improve security, and provide great visitor experiences with its configurable processes, better security measures, easy integration, and data-driven insights.

What is Zoho Kiosk Studio
The Zoho Corporation provides a service called Zoho Kiosk Studio that lets companies design and administer interactive kiosk apps. Businesses can create and implement unique kiosk interfaces with Zoho Kiosk Studio for a range of uses, including self-service check-ins, registrations, surveys, information kiosks, and more.
Key features and functionalities.
- User Authentication and Access Control: Businesses may manage who can interact with the kiosk and access particular features or data by using the user authentication and access control tools that Zoho Kiosk offers. This can involve user accounts, password protection, and guest access settings.
- Analytics and Reporting: to monitor kiosk usage, user interactions, and other pertinent metrics, Zoho Kiosk offers analytics and reporting features. Making data-driven optimization decisions, gauging the success of promotions and content, and gaining insights into user behavior are all possible with this data.
- Integration with Zoho Services: Zoho Kiosk may be integrated with other Zoho apps, including marketing automation, CRM, and analytics tools, as part of the Zoho ecosystem. Businesses can now utilize information and features from other Zoho services within their kiosk applications.
- Security: Zoho Kiosk has security measures in place to guarantee the confidentiality and safety of user information gathered via the kiosk application. This could involve user permission procedures, data masking, encryption, and adherence to pertinent laws like the GDPR.
- Remote Management: By utilizing the Zoho Kiosk platform, businesses are able to remotely monitor and control their kiosk deployments. This includes performance monitoring, software upgrades, troubleshooting, and remote configuration features.
Importance of Zoho Kiosk Studio in Business Operations
- Efficiency: Zoho Kiosk Studio contributes to increased operational efficiency by automating a variety of jobs and procedures. for operations like check-ins, registrations, payments, and information distribution, businesses can utilize the software to establish self-service kiosks. This reduces the need for manual involvement and saves time for both consumers and staff.
- Data Gathering and Analysis: Zoho Kiosk Studio makes it easier to gather important information from kiosk interactions, such as demographics, behavior patterns, and customer preferences. Businesses can use this data to guide decisions and improve their strategies by analyzing it to uncover patterns, preferences, and needs of their customers.
- Cost-Effectiveness: By eliminating the need for additional workers and optimizing procedures, the installation of self-service kiosks powered by Zoho Kiosk Studio can save organizations money.
- Scalability: Zoho Kiosk Studio is made to grow with the expanding requirements of companies. The software can handle different levels of complexity and scale to meet changing requirements, regardless of whether a business runs a single kiosk or a network of kiosks spread over numerous locations.
- Integration: Businesses can take advantage of pre-existing infrastructure and data sources by leveraging Zoho Kiosk Studio’s easy integration with other Zoho applications and external systems. Businesses may develop comprehensive solutions that span several systems and touchpoints thanks to this integration capacity, which improves overall efficacy and efficiency.
Components of Kiosk Studio:
Kiosk-Studio will contain 3 Elements/Components
1. Screen
2. Decision
3. Actions
These 3 Elements are used to complete a task efficiently and effectively without the need for coding.
1. Screen:
This is the only component in Kiosk Studio where users can directly interact with the system. As Kiosk Studio is majorly used for creating user interfaces screens play a major role in creating a good user experience, they are used to display CRM data efficiently.
- Access Kiosk Studio: Log in to your Zoho CRM account and navigate to the Kiosk Studio section. This is found under the “Setup” or “Settings” menu, depending on your CRM version.
- Create a New Screen: Within Kiosk Studio, you’ll have the option to create new screens based on your requirements. Click on “Create New Screen” or a similar option to get started with creating a screen.
- Designing the Screen: Once you’ve started the screen creation process, you’ll enter a design interface where you can define the layout, elements, and functionality of your screen. This may include adding text, images, buttons, forms, or other interactive components based on requirements.
- Integrate the CRM Data: Kiosk Studio allows you to integrate CRM data into your screens, enabling the users to access and interact with relevant information directly. You can choose which CRM modules or fields to display and configure how the data is presented.
- Customize the Interactions: Based on your requirements, you can customize the interactions available on the screen. This might involve defining actions for buttons or touch gestures, implementing workflows, or integrating with other Zoho applications or third-party applications.
- Preview and Test: Before deploying your screen, it’s essential to preview and test its functionality to make sure it meets your requirements and functions correctly in a kiosk environment. Use the preview mode within Kiosk Studio to simulate user interactions.
- Deploy the Screen: Once you’re satisfied with the screen’s design and functionality, you can deploy it to use in your kiosk environment. Zoho CRM provides options for deploying screens to specific devices depending on your setup.
- Monitor and Maintain: After deployment, it is crucial to monitor the performance of your screens and make any necessary adjustments based on user feedback or usage patterns. Regular maintenance ensures that your kiosk applications remain effective and efficient.
Screen Interface in Kiosk Studio
The elements available in the Screen Interface are:
- Display Text: Used to display information/text to the user. It can also be used to give instructions, warnings, and feedback to users.
- Get Records: Used to Fetch records from CRM based on the requirements and display the records to the user. you can also use Get Records to pull multiple records data from CRM. Simply choose a record that belongs to a parent and then choose the child module for it, or select a parent module. Next, you can decide how these records should be sorted, establish criteria for the records to be fetched, and so on.
- Screen Field: The Screen Field will let you see and display the data collected from previous screens.
- Fields in Screens: These fields are used to collect and display user data, as well as CRM data, providing greater flexibility in kiosk data collection and presentation. These fields are not predefined fields in CRM they are defined only on screens.
- Buttons in Screens: Buttons are used to create their own flows/branches in Kiosk. we can customize the button look and style.
2. Decision:
Decision components create kiosk flow branches based on CRM or screen data, similar to buttons. Decisions within Kiosk Studio involve configuring form fields, workflows, design and layout, integration with other modules, and security measures to protect sensitive data. This feature simplifies data collection and customer interactions.
The following elements are required to decide on the kiosk studio
1. Form fields: Deciding the required Fields that are to be included in your Kiosk studio is basically done based on requirements.
2. Workflows: Based on the collected data we need to set up workflows for performing automatic actions.
3. Layout and Design: To create better user interfaces and improve user interactions we need to design and provide layouts to Kiosk applications.
4. Integration: We need to decide on the integration of the Kiosk application with Zoho CRM and third-party applications.
5. Security: Make control decisions and protect and secure the data collected through the Kiosk application.
While creating a decision in Kiosk studio we have to create Paths(Conditions) based on the path the decisions will be getting executed we need to add at least one condition to a path default condition also gets added when we add a path in a decision.
3. Action:
Since they connect the information on the Screens to the rest of the CRM, actions are essential. If a user’s activities lead down a branch of the kiosk, those actions will be automatically carried out. You can utilize the information acquired in the preceding panels when creating an action. For instance, the values entered by the user in previous screens can be applied as the arguments of a function.
Different types of Actions can be performed in kiosks. Field updates, assigning owners, tagging records, email notifications, adding activities, generating records, and running webhooks or functions are some of the available actions.
Different Action Types in Kiosk Studio:
Similar to workflow actions kiosks also have different actions based on the decisions written above the Actions.
- Field Update: If we need to update a field based on the previous Decision then we can use field update.
- Assign Owner: Based on the Decision above Action, we can use this action if we need to assign an owner to a record.
- Add/Remove Tags: this can be used to add/remove the tags for a particular record matching the pre-defined decision.
- Email Notification: If we want to send an Email Notification to the record owner/current user, we can perform this action.
- Task: To Notify the current user/owner about a particular condition we can use task actions.
- Create Record: To create a record whenever a particular decision is executed we can use this action.
- Webhook: Webhooks facilitate communication with third-party applications by sending instant web notifications every time an event occurs in your Zoho CRM. we can create webhooks based on the decision.
- Functions: Create custom functions for performing a particular task based on the decisions.
How to start Zoho Kiosk Studio setup
Signing up for Zoho Kiosk Studio.
We are not required to sign up for Kiosk Studio it will be available on the setup page of the Zoho CRM Account.
Navigating the user interface.
Goto Zoho CRM and click on Setup then click on Kiosk Studio
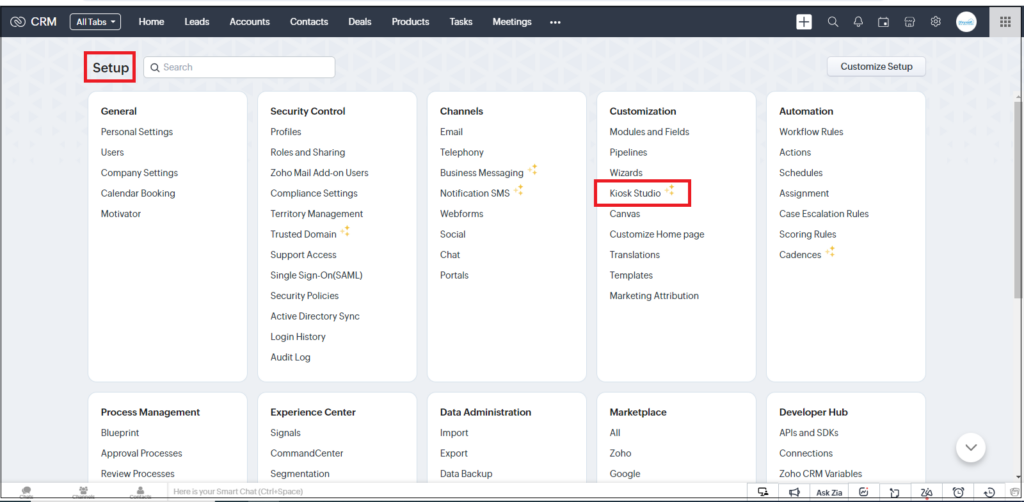
After Clicking on Kiosk Studio on the Setup page of Zoho CRM we are redirected to the existing kiosks page(if there are no kiosks existing we need to create a new one using the Create Kiosk button).
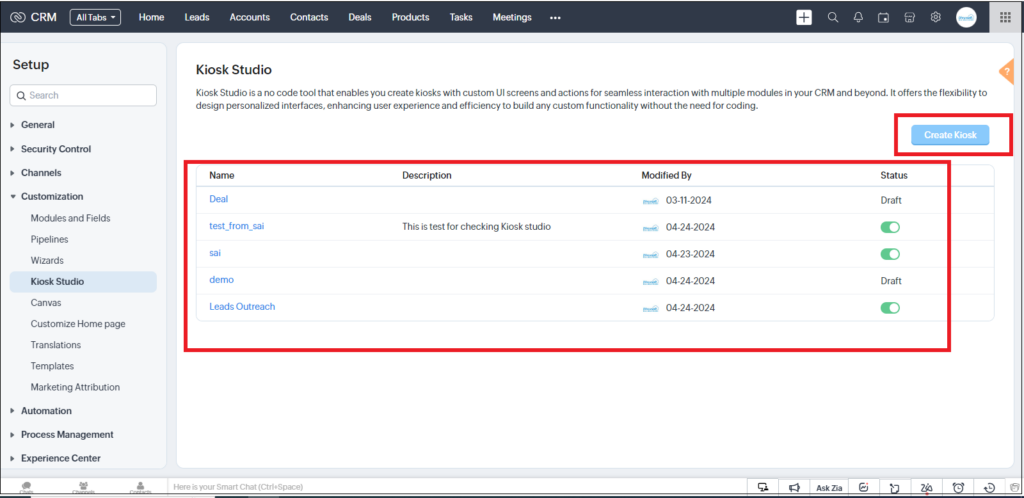
We can only create a Maximum of 5 kiosks in a demo Account(Depending on the edition of Zoho CRM).
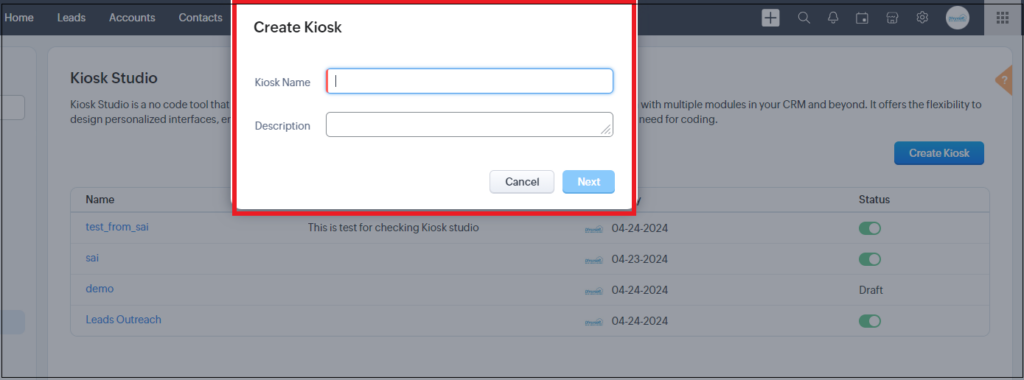
Give the Kiosk name as required and click on next to open the kiosk interface.
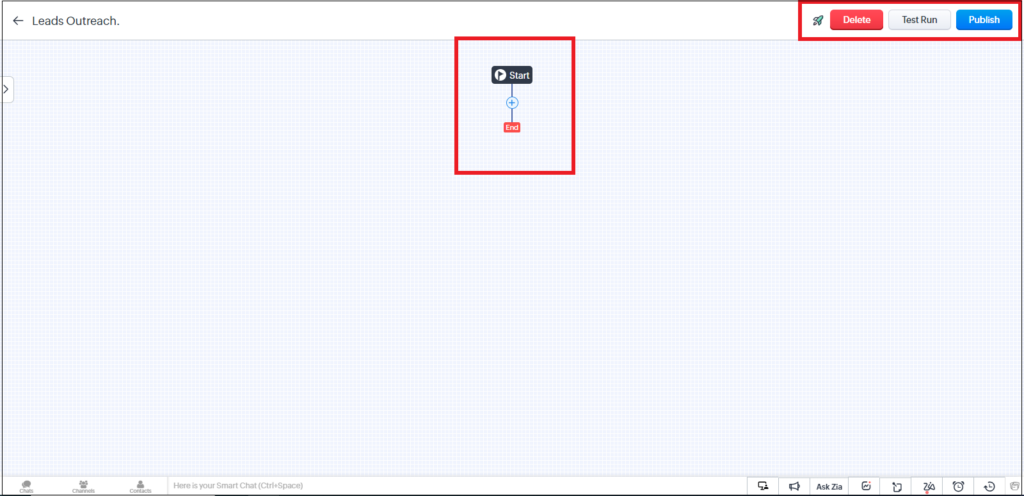
- By clicking the “+” icon we can access the components of the kiosk(Screen, Decision, Actions).
- By Clicking the “Delete” Button we can delete the existing Kiosk.
- By clicking the “Publish” Button we can publish the kiosk and the kiosk gets added to the existing kiosks page.
An Example of Creating a Custom Kiosk:
Consider an example of creating a Custom Kiosk to check if a Lead is in contact or not.
The steps involved are:
- Check if the lead is present in contact or not using the decision component.
- If the Lead is already converted to contact/present in contact then we need to show a screen that has information as Lead is already converted to contact to avoid duplicate entries of the same contact.
- If the lead is not present in the contacts then we need to display a screen stating that the contact is not present.
Steps Demonstration:
Consider a Scenario where we need to update the Email Opt-Out Field for a Contact if the Email Field is not empty for a particular Contact. If a particular contact has Email field as Empty then we just display a screen that has text saying “Email Field is Empty”.
Step 1: Create a Screen showing a message followed by the Contact’s details based on the Email Condition.
Give the Screen name in the Beside Screen Box.
Then Give the required welcome message in the Display Text Field.
We can also add multiple fields using the Add Button.
Click Done.
We can also Customize the Done button it’s alignment and style can be changed by clicking on it.

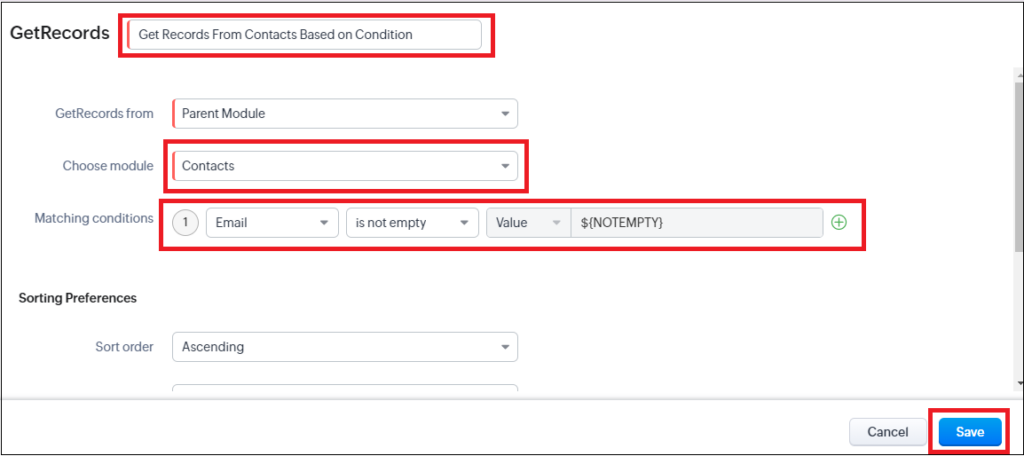
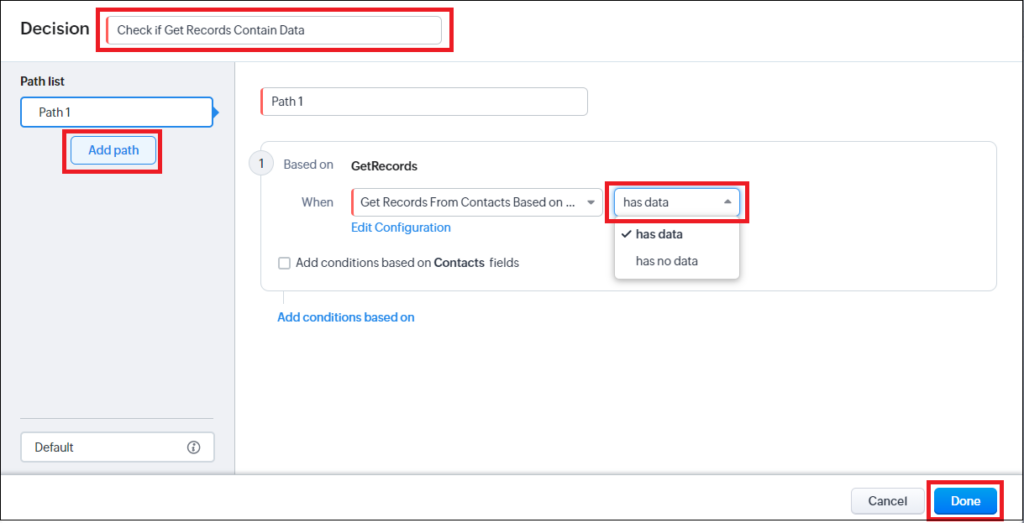
Step 2: Create a Decision Box named Check if Get Records Contain Data and define the Condition if Get Records has data or the Get Records has no data
We can create multiple pathways using the Add path button. pathways are like different conditions.
Click Done this will create a decision box. based up on the path defined in the decision box the corresponding actions will be executed.
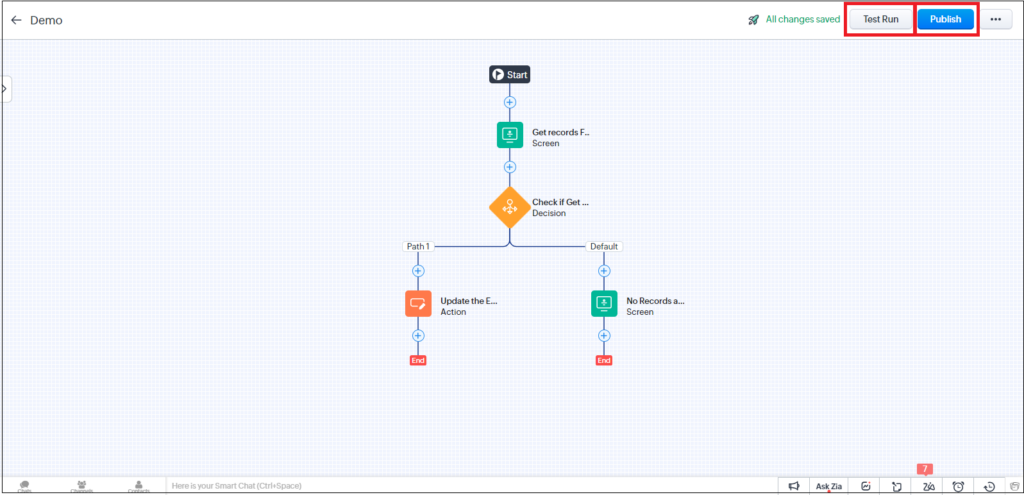
Step-3:Based on the decision box we can create an action to update the field update the field Email Opt-Out will be checked.
Step-4:When we click on Done on the Screen the corresponding action will be executed and the Email Opt-Out field will be checked for the matched records.
We can test the Custom Kiosk created using the Test Run button or we can Publish the custom Kiosk using the Publish Button.


The Created Custom Kiosk will look like this:
Getting Data From CRM to Kiosk Studio
1. Screen Fields: To Get the data from previous screens we have screen fields and they are useful when we want to show the data to the user.
2. Get Records Component: One or more records can be retrieved from a CRM module using the GetRecords component. Screens, decisions, and actions can all take advantage of it. The following output types are available for this component:
- Output of a single record: The user will see just one record. Its field values can be utilized in later screens, actions, and criteria for making decisions.
- Multiple record output: Several records will be retrieved according to the selection parameters.
- Using just one selection: Even though several records are retrieved, the user can only choose one of them. Anywhere that the fields of the single record output are used, so are its fields.
- With several selections: These let you choose from a number of records. The chosen documents may be included as criteria for decisions or in email notification templates.
3. Merge Fields:
A reference to another field is found in a merging field. This will be changed to the value for the referenced field when a kiosk is accessed.
A merging field at a kiosk may point to:
- The fields of the CRM record in GetRecords
- The field from the previous screen
- Fields in the current record
- A field in the user module (for information about the user accessing the kiosk)
- fields of organizations
The following locations are where they can be used:
- On screens: To choose the field, enable Merge from the module and hit #. This lets you do things like show CRM field data for reference, personalize your instructions (inside the text display element on a screen), and more.
- Email layouts: You can add customization to your notice by using merge fields while you’re constructing an email template.
Overview of the workflow creation process
The creation of a workflow involves various stages:
- Using the Workflow Module: Sign in to your Zoho CRM account and navigate to the “Setup” area. The “Workflow Rules” module can be found under “Automation.” Click on it to start creating a new workflow.
- Creating Workflow Rule: Click the “Create Rule” button to begin constructing your workflow rule. A rule is typically composed of acts and conditions. Conditions specify when the rule should be applied, and actions specify what should happen when the requirements are met.
- Establishing Conditions: Select the module (Leads, Contacts, Deals, etc.) for which you wish to build the workflow. Next, specify what needs to happen in order for the workflow to start. Field values, record status, and other factors may be used as the basis for conditions.
- Defining Actions: After the circumstances have been established, state what should happen in each case. Tasks like establishing tasks, altering field values, sending email notifications, and activating webhooks are examples of actions.
- Setting Up Workflow Implementation: Set the schedule for the workflow’s execution. You can provide any additional execution criteria and decide whether to perform the workflow when records are created, updated, or destroyed.
- Testing and Activation: To make sure the workflow performs as intended, it must be extensively tested before being activated. Test records can be used to mimic the behavior of the workflow. Upon achieving testing satisfaction, turn on the workflow to bring it online.
- Monitoring and Optimization: Following activation, keep an eye on the efficiency and performance of the workflow. You may monitor how frequently it is triggered and whether the intended results are being attained. You might need to modify criteria or actions in the workflow to optimize it based on this data.
- Overseeing Existing Workflows: You can manage current workflows in addition to creating new ones. This covers modifying, copying, turning off, or eliminating workflows as necessary.
Integrating with other Zoho apps and third-party services
Workflows from different Zoho apps and outside services can be integrated to improve efficiency, facilitate collaboration, and optimize procedures inside a company. An outline of how to accomplish this integration is provided below:
Integration with Zoho Apps: Zoho provides a range of apps that are intended to simplify different parts of running a business, such as project management, finance, HR, and CRM. Workflows between these Zoho apps can be integrated to automate activities and guarantee seamless data transfer between departments. As an illustration:
- Zoho People/HR Integration: By connecting HR workflows with other Zoho apps or HR management solutions, you may expedite employee onboarding, leave requests, and performance reviews.
- Zoho CRM Integration: Sync data, assign leads, and send follow-up emails automatically between Zoho CRM and other email marketing platforms.
- Zoho Books/Finance Integration: By integrating with other Zoho apps or accounting software like QuickBooks or Xero, you can automate the creation of invoices, reminders for payments, and financial reporting.
Automating Tasks
Leveraging automation to increase efficiency
By cutting down on manual labor, optimizing workflows, and raising overall output, utilizing automation in Zoho CRM may greatly boost productivity. Here are some essential methods for making use of Zoho CRM’s automation features:
Examples of common automated tasks
- Email Templates and Mail Merge: Send customized emails to contacts or leads in bulk by utilizing email templates and mail merge capability. For typical email correspondence, such as follow-ups, welcome emails, or newsletters, you can make templates and utilize mail merge to add recipient-specific data to the content.
- Scheduled Actions: Arrange for certain tasks to be completed at predetermined periods or intervals. For example:
- Set up meetings or follow-up calls with leads at predetermined intervals.
- Make notes on significant assignments or due dates.
- Set off automated answers to questions or form inputs.
Managing User Access
Implementing user roles and permissions: Setting up user roles and permissions in Zoho CRM’s Kiosk Studio entails controlling user access and limiting what users can see and do within the program. Here’s how to set up roles and permissions in Kiosk Studio and control user access:
Accessing User Roles and Permissions:
- Open the Kiosk Studio after logging into your Zoho CRM account.
- Either scroll to the “Settings” section or click the “Settings” icon.
Creating User Roles:
- Find the “User Roles” or “Roles and Permissions” option in the Settings section.
- To define a new user role, click “Add Role” or “Create New Role.”
- Assign a name and description to the role that appropriately reflects its authority and scope.
Specifying Role Permissions:
- After a role has been formed, its permissions can be specified. Typically, permissions give users access to records, modules, and particular application activities.
- Decide which modules people in this role should be able to access. For every module, you can set read, write, delete, or export permissions.
- Define extra permissions, including the capacity to handle other users, alter layouts, or import data.
Role-Assigning Users:
- Assign users to roles after defining the position and its permissions.
- Go to the Kiosk Studio settings and find the “Users” option.
- Each user should have their user profile edited and be assigned to the proper role.
Testing Permissions:
- It’s critical to test roles and permissions to make sure they operate as intended after they have been configured.
- As the user designated for the role, log in and confirm that you can only access the modules and take activities that are permitted by your permissions.
- Based on the results of the tests, make any necessary modifications.
Frequent Evaluation and Updates:
- Review and update user roles and permissions on a regular basis to conform to new needs, role modifications, and organizational changes.
- To ensure security and effectiveness, modify permissions as your company grows and new features are added to Zoho CRM.
Controlling access to sensitive data
As CRM Involves controlling and managing confidential data it is important to maintain and control the access to data.
- Record-level Security: Use record-level security to limit access to particular records according to standards like record-sharing guidelines, team membership, or ownership. This keeps unapproved people from viewing or editing private documents that they are not legally allowed to access.
- Enable two-factor authentication (2FA) : For users of Zoho CRM to provide an additional security measure on top of passwords. When 2FA is enabled, users are required to submit an additional form of authentication, like a one-time passcode texted to their mobile device, in addition to their password, to access the CRM.
Ensuring security within the platform
To ensure the security of the Zoho CRM platform we will implement the following steps:
- Security Compliance: Verify that your company and its location are in compliance with all applicable security standards, laws, and industry guidelines. To ensure compliance, keep up with any changes to security regulations and update your security procedures accordingly.
- Data Encryption: To protect data while it’s in transit and at rest, Zoom uses encryption. Industry-standard techniques are used to encrypt data in order to keep it private and stop illegal access.
Reporting and Analytics
Tracking workflow performance
Monitoring the efficiency of your automated processes, pinpointing areas for development, and streamlining workflows to increase output and productivity are all part of tracking workflow performance in Zoho CRM. In Zoho CRM, you can monitor workflow performance as follows:
- Make Use of Dashboards and Reports: Utilize the dashboard and reporting tools in Zoho CRM to monitor and display workflow performance data. You can monitor key performance indicators (KPIs), spot trends, and quickly evaluate performance by creating personalized reports and dashboards that are customized to your unique workflow processes.
- Keep an eye on Automation Rules: Examine automation rules, triggers, and actions that are used in Zoho CRM workflows on a regular basis. Keep an eye on how automation rules are being applied to make sure they are working as planned and for the correct actions to occur where and when they should.
- Track User Activity: To keep tabs on user actions within Zoho CRM processes, keep an eye on user activity logs and audit trails. Determine which users are interacting with tasks, leads, or opportunities actively and evaluate how this affects the efficiency of the process.
Generating reports and insights
With Zoho CRM, reporting and analytics are essential for monitoring workflow performance and learning about sales procedures, client interactions, and business metrics.
There are different types:
Standard Reports: Numerous common reports that offer insights into many company elements are available in Zoho CRM. Among these reports are:
- Sales Pipeline: Monitor how deals move through the various stages of the sales cycle.
- Lead Conversion: Examine lead conversion statistics and pinpoint the elements that make a successful lead conversion.
- Sales Performance: Keep an eye on revenue trends, and team and individual sales representative performance.
- Forecasting: Project future sales using pipeline estimates and historical data.
- Activity Summaries: To gauge client engagement and follow-up activities, keep track of meetings, emails, and phone calls.
Custom Reports: Tailor reports to meet your unique needs and corporate goals. Using pertinent modules, fields, and criteria, create bespoke reports to examine particular facets of your sales process or customer information.
Dashboards: Create dynamic dashboards to see important metrics and KPIs instantly. Dashboards let you keep tabs on goals’ progress, evaluate performance quickly, and pinpoint areas that need work. Add widgets, charts, and graphs to your dashboards to present data in an eye-catching way.
Reports that can be scheduled to be generated and sent automatically at predetermined times are known as scheduled reports. Schedule reports to get insights and updates sent to you via email so you can monitor workflow performance without having to manually intervene.
Using analytics to optimize processes
- Workflow Analytics: Track and evaluate workflow performance indicators to evaluate how well Zoho CRM’s automation rules, triggers, and actions are working. Monitor important workflow indicators like pipeline velocity, lead response time, conversion rates, and job completion rates.
- Integration with BI Tools: To do advanced data analysis, create custom reports, and display data from many sources, integrate Zoho CRM with business intelligence (BI) tools like Zoho Analytics or third-party BI platforms. BI integration enables you to take your CRM data and turn it into actionable intelligence with deeper insights.
Limitations of Fields:
- We can add only 20 Fields to a screen.
- Display elements and Fields Can’t be rearranged.
- The button’s position also cannot be changed once created.
- Buttons can’t be resized.
- Buttons are displayed right-to-left on a screen.
Conclusion
Zoho Kiosk Studio is a solid option for organizations looking to improve visitor management while also increasing security and productivity. Businesses may personalize kiosk interfaces to their specific needs with its user-friendly interface and customizable features, all without coding skills. The platform’s connectivity with other Zoho apps and external systems improves its capabilities, allowing for easy data exchange and process automation. Organizations can realize the full potential of Zoho Kiosk Studio by using analytics data and optimizing procedures to create amazing visitor experiences and promote commercial success.
Discover the potential of Zoho Kiosk Studio today and revolutionize your guest management operations. To improve your company processes, provide personalized dashboards, easy integration, and increased security contact dhruvsoft experts right now and Take control of the visitor experience by exploring the limitless options for customization and efficiency. Try Zoho Kiosk Studio right now to improve the way you handle visitors and move your business ahead.
Discover the power of Zoho Kiosk Studio today and transform your visitor management operations. To improve your company’s procedures, we offer personalized dashboards, easy integration, and increased security. Contact Dhruvsoft experts now to take control of the visitor experience and explore limitless options for customization and efficiency. Try Zoho Kiosk Studio now to improve how you interact with guests and move your business ahead.


 “ZOSuccess” is the Zoho Consulting Practice of Dhruvsoft Services Private Limited – a leading Zoho Advanced Partner from India – providing services worldwide …